Colour and Learning Design

Various shades of white are displayed along with their names and corresponding paint codes. It's positively overwhelming.

After going through all the heavy lifting of research, curation, planning and the like, asking yourself questions like “but what colours am I going to use?” can sometimes feel like the last thing you want to think about.  It can be a surprisingly nuanced decision point: thinking about use of colour too late into a project leaves you with constrained options; commit to certain colour schemes early on though, and you might find that you’ve painted yourself into some awkward looking corners. Fortunately, you can guide your thinking on the subject by focusing on different forms of application: functionally, in service of accessibility, and rhetorically. Let’s dig in!

Functionality

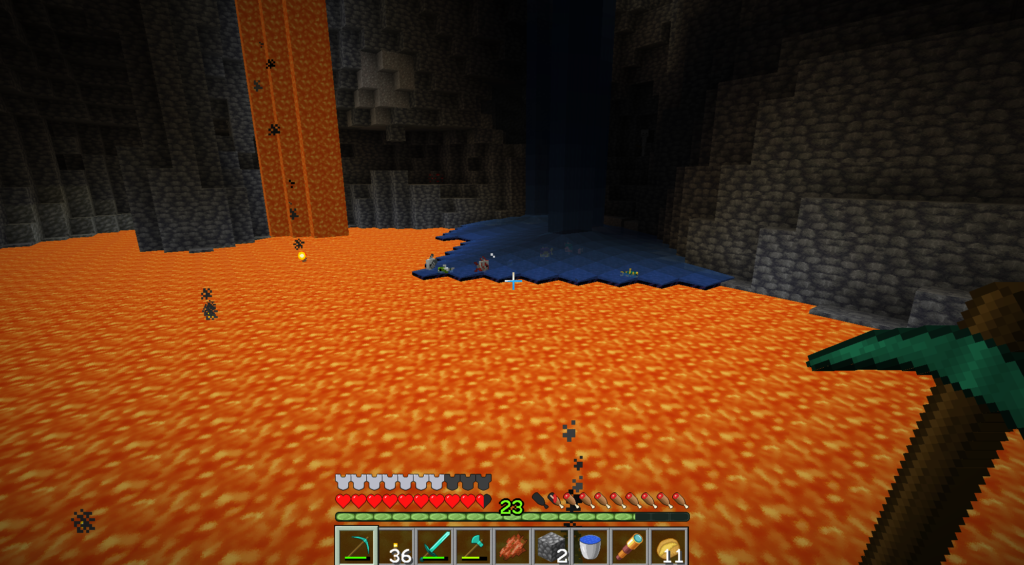
We can see how colour functionally drives user navigation in the 2008 Electronic Arts title Mirror’s Edge (the gif below is from a 2016 reboot). The game often has you leaping and running around rooftops, so, naturally, things can move kind of quick. For the game to function as an entertainment product, it needs to find ways to quickly communicate itself to the player while they’re performing these breakneck parkour maneuvers. This is accomplished by using colour, usually bright shades of red and orange, to guide the player through an otherwise washed-out cityscape.

A person grabs onto a cable and rides it to a nearby rooftop, letting go and touching down down with a tuck-roll.
Mirror’s Edge: Catalyst (2016) via Kotaku

It’s an example of what we would refer to as ‘signaling’: using colour and contrast to flag something for a learner, guide their attention, or highlight something of interest. Colour is a huge part of signaling, and often times during course design we’ll find ways to incorporate and combine it with other visual aspects to establish emphasis. This usually happens by way of titling, headings, or symbols and shapes that can denote course specific activities or attitudes.

Accessibility

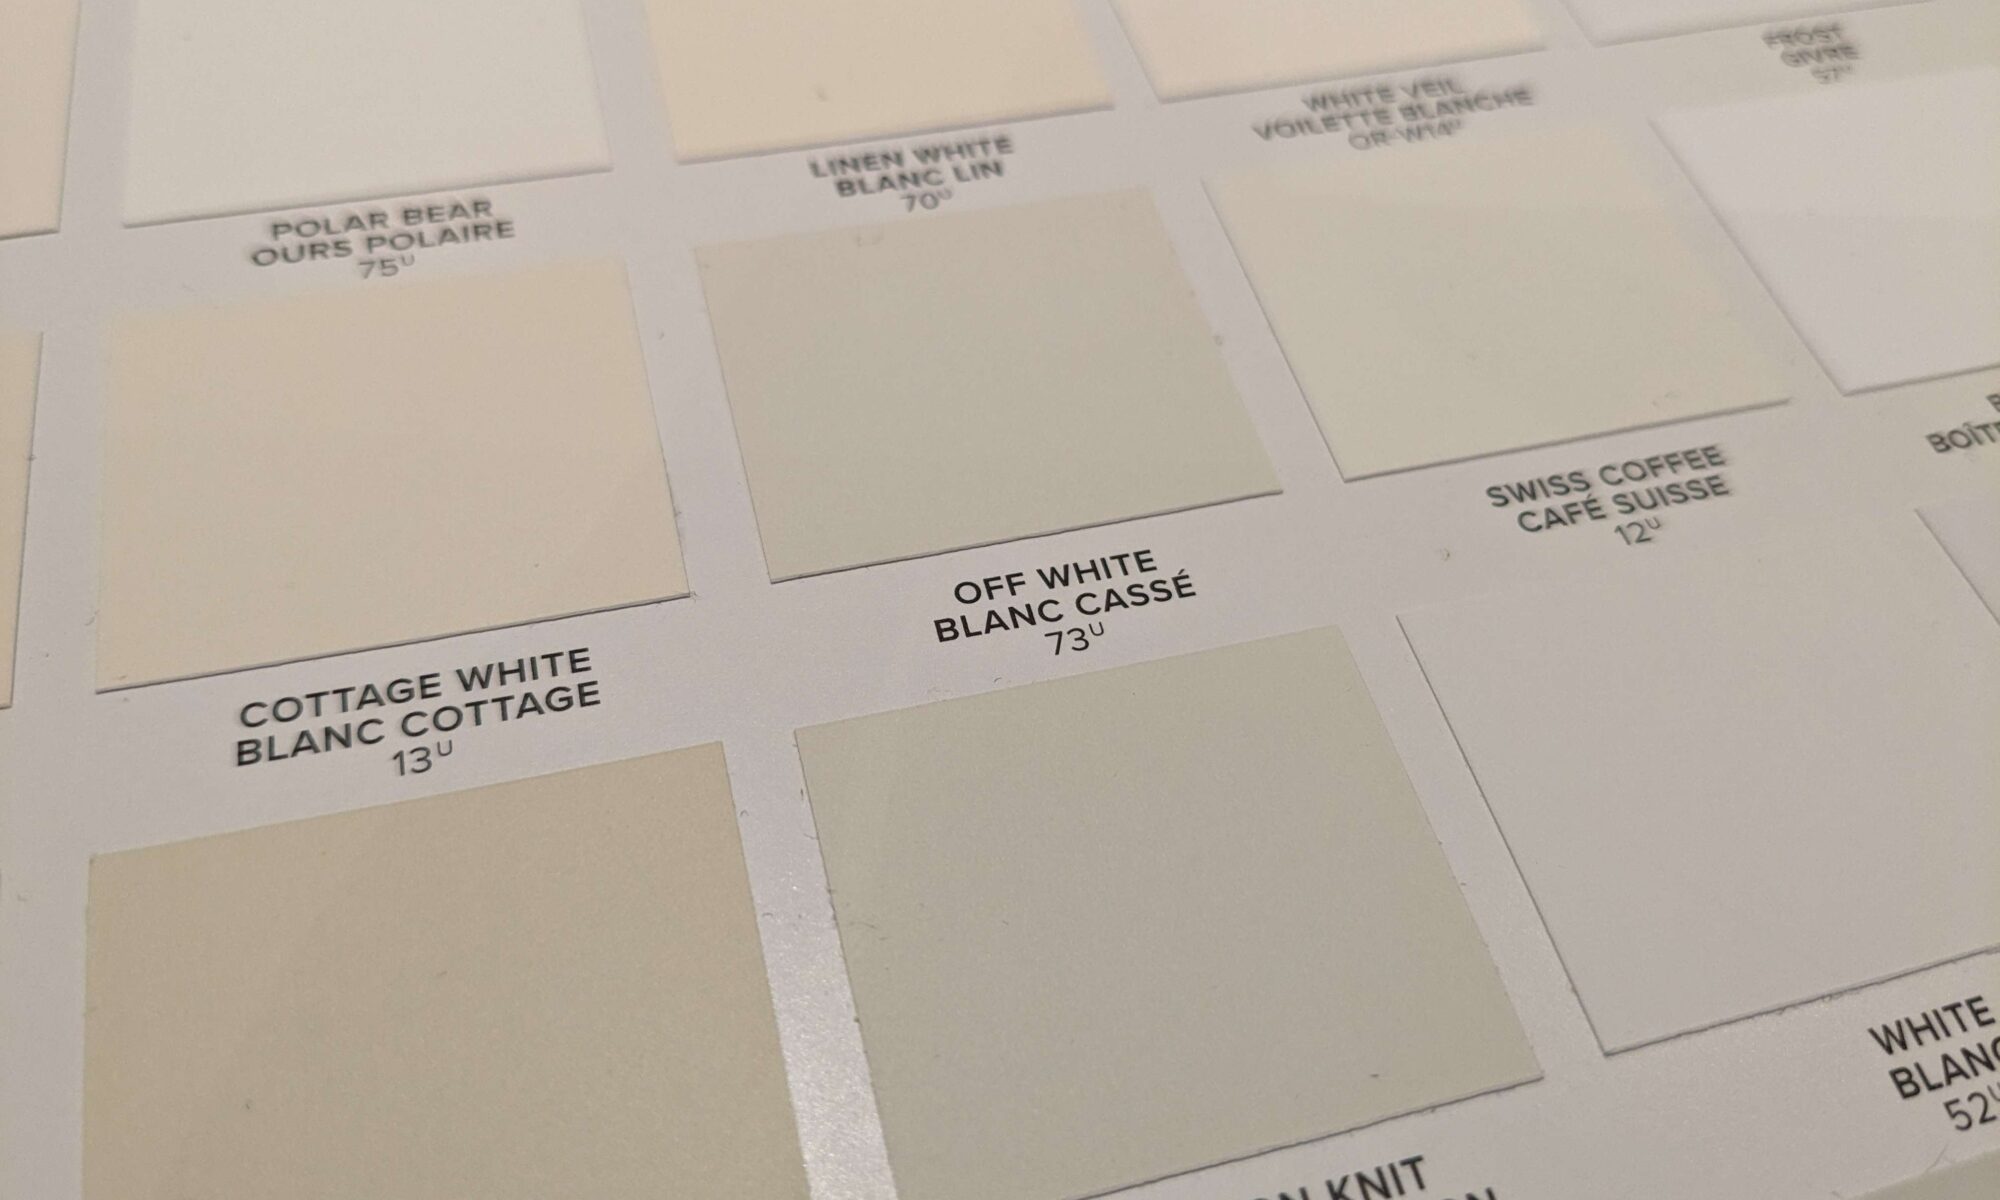
You’ll want to make sure that your colour scheme is clear and legible. While a monochromatic or complementary colour scheme might look great, it might also make text more difficult to read—especially in large quantities. Things like the Adobe Contrast Analyzer (a tool we’ve covered before) will allow you to play around and see what works, giving you the opportunity to tweak and experiment before creating your visual resources.

While it’s important to pay attention to how you use colour, you’ll also want to consider what happens when you don’t have any of it. If critical information is being communicated exclusively through colour it likely won’t convey the intended messaging to learners that have low vision or possess some form of colour-blindness. The same goes for certain types of graphic content like diagrams or maps that rely on colour to visually distinguish key details. In these cases, you can use image alt-text to clarify information for learners with fulsome descriptions.

Rhetorically

Check out this clip from Silicon Valley that pokes fun at the kind of conversation one might expect to have at a ‘design meeting’.

It’s easy to laugh, but a large part of design really is about developing a shared, aesthetic language—not just with collaborators, but with the audience as well. If you’re creating a course that deals with somber subject matter, you might not want a lot of bright colours that could conflict with the tone or the messaging. Just as well though, leaning into convention or going too hard the other way might defang the content to the point of feeling disingenuous or hokey. It’s the kind of nuanced interplay that a learning designer will be able to help you negotiate. If you’re looking to give your own course a facelift, take the content you know you’ll be working with and see if you can spot existing patterns either in colour (a lot of my visuals come from literal fieldwork, so there’s already a lot of green) or in context (a lot of the books we’ll be reading are written by Spanish authors, the national flag of Spain has red and yellow). You can also take it a step further and start thinking more conceptually. Does the content feel warm or cold? Would it taste sweet or spicy? Thinking along these lines can help you arrive at a combination of colours from which you can start experimenting and testing.

So Now What?

Hopefully you’re excited, and I haven’t scared you away from the work of colour design! Trying stuff on and experimenting with different hues, shades, and combinations can be a fun process. While you might find certain things work better than others, rarely if ever will there be one single perfect answer when it comes to that interplay between form and function. Keeping your target audience in mind (how will they use your resources; how can you use colour to make things clearer or easier) is a great way to stay accountable while exploring the ways that you can enhance an experience.

For additional reading when it comes to colour you can check out this freely available colour theory resource from RMIT University to learn about about colour’s historical contexts and scientific underpinnings. If you want to read more musings about what it takes to design and cultivate wonderful courses, you can read about how to fail your way to success. And of course, now and forever, you can get in touch with Trent Online, the technologists, and the elearning designers whenever you like by booking an appointment.

If Yes Then Build

A seaside home-in-progress in Minecraft.

Over the last few months, I completed my first solo(ish) PC build under the tutelage of our Multimedia Designer James Bailey. What started as simply something to do with spare parts quickly took on a life of its own and culminated in putting together a Minecraft server for my friends to enjoy. At every step of the way I found myself reminded of our work at Trent Online, and what it takes to develop and refine our digital learning experiences. Ideating, planning, building, testing, fixing, iterating, failing, succeeding—it was quite the wild ride. Below you’ll find some of my more coherent musings.

Don’t Force It

Originally the plan was the use all my spare parts and acquire any outstanding items needed for the build very cheaply, either through online sales or by picking the bones over at ReBOOT Canada. My first fan no longer worked with the motherboard it came with. The second fan was too old and would have needed a hard-to-find adapter, and the third didn’t have the right brackets to secure it to an Intel board. After weeks of scrounging and swapping and returning, I finally decided to cough up a hundred dollars and buy myself a new fan with all the accoutrements I’d ever possibly need. Whether you’re trying to save a buck or trying to do things “the way you used to” in an online class—it can often save time and trouble to take a step back and ask yourself the following:

  • How much time will it take to retrofit this old piece into my course?
  • Has enough time passed where it is now necessary for me to re-assess the functional needs of my course?

Sometimes it’s a case of the design informing the material. Other times the design will need to lend itself to one key immutable piece of content. Knowing what the sacred cows are at the outset of any project will save you the time and energy spent trying to jam square pegs into round holes.

The fourth and final fan to be attached.

Freedom to Fail

The first power supply unit I ordered was a lemon. I had also bought the wrong case for my motherboard’s form factor. The new case didn’t fit the wireless card I had and, as previously mentioned, it took four (4) fans before I finally attached one that functioned properly. Even after I finally got the computer to power up, it didn’t recognize my hard drive. All of this is simply to say that I messed up, a lot, in every stage of my build. The only thing that kept me from succumbing to the annoyances of my failures was reminding myself constantly that this was my first foray into building a computer for myself from scratch. Even though I kind of knew what I was doing—even with the tutelage of my colleague—mistakes were made. It took a couple screw ups before I got there, but eventually I mocked up the computer I was envisioning using a website that would automatically check to make sure there wouldn’t be any compatibility issues with all the pieces I needed to fit and work together.

It’s the same reason we put together a course map before building out modules in Blackboard. One thing I’ll get asked a lot when setting out to develop (or re-develop) an online course is “why can’t we just build it in the LMS straight away?” The short answer is that it’s far easier to make a change on paper than it is mid-build. As well, changing one piece midway might mean that something we constructed weeks ago no longer functions as intended (either scholastically, technologically, or both). The drafting phase builds in that time and space to experiment, make errors, and come up with working solutions. This isn’t to say you can’t build an airplane while you’re flying it, just that most people shouldn’t.

An ocean of lava met with a patch of water–these fish are living dangerously!

Consult the Experts

After getting the computer stable and running, after muddling my way through various tutorials, I had created a functioning Minecraft server for my friends to enjoy. Researching the initial set up meant I needed to develop a rudimentary understanding of how my computer’s firewall was interacting with my home network and the internet at large. More than just getting the thing up and running, I wanted to make sure things were safe and secure for everyone that would be playing on the server. It meant I needed to be aware of exactly what I was getting us into and what could maybe possibly go wrong (things like Log4j, for example). Between consulting friends of mine that are system administrators and finding a Discord server specifically geared toward this exact topic (Minecraft server administrators), I was able to get some answers, clear up some misconceptions, and glean insights from people that had been down this exact road before.

If you’re building or designing a course the Admincraft Discord might not be the best place to seek guidance—but I daresay our robust institutional support network has you covered:

If you have a specific question in mind or are just looking to bounce ideas off someone—it never hurts to ask!

Craft Your Community

A big part of managing my fledgling server meant listening to the wants and needs of my friends and then delivering on it. Whether it was little things like server names and icons, or more critical changes like the amount of dedicated RAM, I noticed that actioning stuff and making incremental changes didn’t go unnoticed—facilitating and negotiating the experience with my friends was appreciated. The same goes for any online learning experience; conversely, if you take a “set it and forget it” approach after the thing goes live, that lack of TLC might not bode well morale-wise. As part of our course development process in Trent Online, we’ll often find ways to craft additional spaces and check-in surveys so that instructors can hear from the students before the course is over (giving them the opportunity to make improvements or adjustments on the fly). Ensuring members of your learning community feel heard and actioning on that feedback communicates a shared understanding of values.

In Closing

What did I learn? I’ll summarize in a bulleted list:

  • If it feels like you’re forcing it ask yourself why that might be—it might be a sign that you need to re-think your strategy.
  • Take feedback to heart and use it to improve things when you can, even if it’s just incrementally.
  • When in doubt, reach out—everyone starts somewhere, there’s no shame in seeking guidance.
  • Things worth doing are usually quite challenging. Don’t be afraid to make mistakes along the way!

If you’re curious about what Minecraft has to offer in a scholastic capacity, you can check out Minecraft: Education Edition (like this lesson about Anishinaabe culture). If you’d like to chat with an elearning designer (possibly about Minecraft), you can do so through our online booking system.

The Case for Space(s)

Last week an impromptu conversation I had with officemates had me thinking about the rhetoric of digital spaces—specifically the attitudes embodied by dating apps. The most popular dating apps, to me anyway, each seem to strike their own distinct tone: Tinder is for swipin’, Hinge is for something more serious, and Bumble kind of seems to operate in between. Depending on what you’re looking for, one space might be more conducive to your search than another—which is an interesting notion given that all three applications serve the same purpose (more or less).

It’s an idea I explored while working through the curator Extend module and the same could be said of learning in a sense—in person, online, on a boat or a plane—learning can happen anywhere, but depending on the tone of the space, some components of that activity might get accentuated or mitigated. It’s a concept worth considering, especially given the speed and scale with which we’ve pivoted online. While I’m definitely probably not qualified to give anyone dating advice, I do have a few recommendations for digital spaces worth considering.

Padlet

Padlet has proven to be a total workhorse for us. We’ve seen it get utilized as an announcement style pin-board, a space for low-stress discussion and feedback collection, even as a way to compile notes at the end of workshops. Within Blackboard (or any LMS, really), Padlet signals a visual distinction that can offer a friendlier vibe than your nuts and bolts discussion forum is generally able to achieve. The flat space offers students a different way to engage with material that asks them to visually organize it, rather than passively receive it. In addition to a number of slick looking templates and presets, Padlet also lets you do a little window dressing yourself should you feel compelled to upload your own imagery. Signing up for a free account gets you 3 padlets, with the option to pay and upgrade for more capacity. If you’re curious what Padlet looks like in action, you can check out our OERx21 conference presentation embedded below.

Made with Padlet

Microsoft Teams

Since pivoting online, we’ve had some time to iron out wrinkles in process and offer different kinds of online solutions to instructors and students. In addition to YuJa and Zoom, students and faculty can take advantage of Microsoft Teams which comes locked and loaded with your Trent login. Whether you’re looking to curate the experience yourself, or let students take control and do their own thing, Microsoft Teams lets you chat with text and video, swap files, and get organized. Teams functions as a bit of a liminal space: it’s not bolted onto Blackboard, but it’s still considered ‘in-house’ when it comes to institutional software support (Trent Online and IT will be there to help you if things get weird). Perfect for collaborating on bigger projects, students can get to Teams with Trent’s offering of Office 365.

Microsoft Teams’ Desktop Environment

Discord

You might have heard about how they walked away from Microsoft’s billion dollar offer, and with over 100 million active users it’s safe to say that Discord is kind of popular. Originally marketed as Skype for gamers, Discord has evolved over the years into a one-stop-shop that combines voice chat with streaming, screen sharing, texting, and a robust assortment of management tools to help cultivate your community (stuff like custom emojis, for example). It’s a piece of software we’ve written about before, and since then Discord has put even more effort into shoring up how users get onboarded and communities get created within their platform. While setting up an off-site space might seem intimidating, having a soft place to land that’s outside the LMS can help build camaraderie in a bit more of a laid back atmosphere.

Discord’s Desktop Environment

So there you have it: the in-house, the on your own, and the in-between. What you do with it is up to you! While all 3 of these tools offer different spaces in which we can communicate, they all tackle communication from different angles. Have you used one of the things mentioned above? Got one you can’t live without that you’re dying to tell everyone about? Feel free to leave a reply below and tell us what time it is.

Image Sources: Pixabay, Discord, Microsoft Teams,

The Not-So-Distant Learning Podcast with Stephanie Park

“I think it’s really important that people don’t lose their voice in all of this…you can be personal with your students, build that relationship and still be super professional – and have a more successful experience with your students because of it.”

Stephanie Park

In this episode of the Not-So-Distant Learning Podcast, co-hosts Maureen Glynn and Terry Greene chat with one of their fellow E-Learning Designers, Stephanie Park, about her work supporting Trent faculty transition their courses to remote delivery over the summer and fall. It’s the last episode before Christmas break, so we also play a Christmas Ghost Game!

Some resources mentioned throughout the conversation:

  1. Save Me Dog Rescue is the organization Stephanie volunteers for and adopted her dog Cooper from!
  2. As a community-based organization, Contact North | Contact Nord helps underserved Ontarians in 800 small, rural, remote, Indigenous and Francophone communities get jobs by making it possible for them to access education and training without leaving their communities.
  3. Seven Fallen Feathers:  Racism, Death, and Hard Truths in a Northern City by Tanya Talaga.
  4. The H5P Studio from eCampusOntario is a great tool to help faculty create interactive activities.
  5. The Zoom Whiteboard and How To Use The Annotations Tool
  6. To play along with our Christmas Ghost Game, add these two classic holiday flicks to your must-see list: The Christmas Carol and Elf!

We hope you enjoy listening. If you’d like to get involved in a future episode, let us know by emailing online [at] trentu.ca. You can also comment below (and subscribe to this blog below, too!)

Stay tuned for the next episode coming soon!

For a version of this podcast with a transcript, listen on Stream.

Featured image: https://www.hughwhitaker.com/

How to Take Advantage of Random Blocks

I’m not talking about the gift-bearing cubes from Super Mario here (although that would also be very, very cool), I’m talking about the way that tests in Blackboard can be structured. Using random blocks in your test is great when you only want some of your test to be randomized. Or if you want to only serve up a fraction of the total question pool.

A quick demonstration of how to create a random block of questions in Blackboard

To create a random block, you’ll need to have already created a pool of reusable questions. After selecting the questions from the pool that you want to use (I opt to grab everything) you’re then able to select how many you’d like randomly displayed to students during the assessment.

If you’ve already created all your questions in a test but would like to take advantage of the block system, you can populate a pool with these by clicking the “Find Questions” button while in the Pool Canvas (this will be a visually similar process to what you see above, but instead of selecting questions from pools to put into your test, you’ll be selecting questions from a test to put into a pool).

Random blocks (and question sets) are great ways to organize and administer testing in Blackboard. Do keep the following in mind while crafting your assessments:

  • Double check how many questions you want to display from the number selected (this is generally set to ‘1’ by default)
  • All questions found in the block or set will award the same number of points; you are not able to adjust the scoring of individual questions.
  • The order of questions (or blocks) in a test can be adjusted by hovering your mouse over the left-hand side of an element, dragging, and dropping into place

You can learn more about Test Pools by reading Trent IT’s user guide. If you think you need a helping hand with things, or a couple extra pointers, you can get in touch with all of us by emailing online[at]trentu.ca.

Featured image by Christian Metaxas

Add Some Flavour to Your Discussion Boards

Are your discussion boards tasting a little bland lately? Maybe it’s time to pour some homemade sauce on that discussion board to spice things up.

These boards typically have but one ingredient: Endless, endless text. This simple recipe adds just a few more ingredients: openly licensed imagery, any photo editing software, and each other. Here are the basic steps for students to follow (That’s right, your students are doing the cooking):

  1. Skim, scan, or even read deeply through the threads for a quote from a peer that resonates with you. Any kind of remark that you feel deserves some recognition for being a smart one works. Copy that text and take note of who wrote it (for attribution).
  2. Head over to a place where you can get openly licensed images that you are free to use without worrying about copyright issues (like Unsplash, Pixabay, or Creative Commons Search) to find an image. Bonus points for an image that symbolically relates to the quote. For example, if the quote you’re saucing up is about “stretching our resources” your image could be someone pulling apart some play-dough or something. You get the idea. Take note of the source of the image (again, for attribution).
  3. Now that you have the quote and the image, you just need to put them together. Open up that image file in any photo editing tool or app that you have. Whether you’re on a PC, Mac or phone, there are instructions here to add text to an image.
  4. Once you have fancied up that quote with an awesome image, head on back to the original discussion board and post it! Make sure to let the person you quoted know about it, as they would likely enjoy seeing their words on display all fancy-like. Don’t forget to add alternative text to the quote for accessibility reasons.
  5. Enjoy the new taste sensation of a discussion board with some flavour!

Here, have an example (note that the quote is attributed to the writer and the image is sourced).

Terry Greene

Think this is just too crazy of an idea? Maybe, but it has been done before! Check out how Ontario Extend did it in one of their “Daily Extends”. If you try it out, let us know how it worked out!

Featured photo by Charisse Kenion on Unsplash

Watching the Joy

Dr. Katrina H Keefer

“Every morning I get up and I watch the war, watch the war, watch the war,
And every morning it upstages everything I know”

(Jonatha Brooke & the Story: War, 1995)

We live in stressful times, and while there are increasingly patches of sunlight pertaining to remote learning, too often the ambience has been one of confusion and fatigue among my fellow instructors as they wrestle with learning systems and how to engage their classes in ways which resemble the enthusiasm we all like to imagine exists in our seminar rooms. It seems ingenuous to compare it to the grinding apathy of experiencing conflict through the absorption of media, but in a sense, there are enough similarities to draw the parallel. We take in what we share with one another, and throughout the fall term, for too many, there was stress and fear and worry. It echoed around academic circles, and with every retelling, the feeling of shared distress almost visibly grew within the comment sections.

That’s not my story, though.

By sharing my own experience, and how I got to where I am, I hope that I may offer another ray of light to continue driving away the foggy clouds of confusion and tension, and provide another tool through which readers might be able to connect still more with their classes.

I’m a historian by training and passion, so it’s only right to begin with some history and context. For decades now, I’ve taken what free time I have into video games, often mixing them with my research, but typically relying on Voice over Internet Protocol (VoIP) applications to facilitate my games when I team up with other players to accomplish mighty digital deeds. I’ve been familiar with Mumble, Skype, TeamSpeak, and all the rest for years now, and over the past five years, one VoIP really began to dominate the games I played; it was called Discord, and it allowed gaming guilds to build servers, organize text and voice channels, discuss strategies, and conduct group missions or raids.

Discord is a free application which can be run both as a downloadable executable tool, and a web-based chat system. It’s a freemium business model, where users pay for extra services, but the security, low latency, convenience between PC and mobile uses allow for a rapid community-building platform which many gaming guilds have used to great effect. While Discord controls all the many images, files, and messages sent through its service, it has openly stated that it will not sell information from users, and it does not use advertisements.

You can see, I suspect, how this would be of interest to a variety of communities, and Discord’s success is testament to its strategy. Its success has also landed the company in some hot water over time, with alt-right groups using it to organize rallies thanks to its relative privacy and how easily used it is. Life is never sunshine and roses, especially where the internet is concerned, and where those who use it for unsavoury purposes are concerned.

That said, I confess that when covid-19 became the institution-closing pandemic it became, and classes were abruptly halted, I was somewhat surprised when my incredible group of first year students asked to use Discord as a way to keep up with our weekly meetings. I’d offered to work with whatever tool they chose – I expected something like WhatsApp, which my antiquated BlackBerry despises, frankly – and I was not only relieved but delighted by their choice.

I duly set up a Discord server, and for the remaining weeks of class, we had some really great discussions. As fall rolled up, I immediately decided to try the same approach, but more intentionally, and I therefore invited students in my second year course to join a class Discord I built. I did not make it mandatory but instead optional, providing Discussion Boards through the Blackboard LMS should students elect not to use Discord.

The whole class pretty much joined Discord immediately. There is always some early intensity when you’re fostering a sense of community, and one mixed blessing of the application is that I can have it open throughout my work hours. This allowed me to devote the requisite time to the class to help them feel safe and comfortable, but it also meant that I was always “on” so to speak. Not a great hardship for me given my gamer past, but certainly not something that every faculty member might crave at least initially.

Every morning Discord automatically launches as my computer turns on, and every morning I would read through student conversations. At first they were stilted and formal, but as I commented frequently, encouraged them steadily, students began to risk themselves with one another. The turning point came in late September when two students began to discuss what it feels like to be Black in Canada in the general channel. I’d taught one before, and they had always been quiet in person, clearly uncomfortable in a seminar room full of peers who likely did not grasp the challenges that come with being racialized. In Discord, I saw an entirely different person from that quiet student; I saw someone who was active, engaged, vocal, and brave. I watched as they opened up and spoke frankly about their experiences, and other students entered the discussion in positive, encouraging, beautiful ways that continued to build a feeling of community.

I chose to be as vulnerable myself as my students were being, and I spoke freely about my passion as an Africanist, as a scholar of identity, and my strong feelings around the injustices of the slave trade and its terrible legacy. The students gave back what I gave them, and increasingly, the community was one of support, strength, and ongoing commitment to learning more. I made a point of reminding students that I and my TAs would not be marking them for weekly contributions but as an average of ALL their contributions throughout the term. My intention in this was to take the pressure off already overloaded learners and do my best to make their engagement in this platform one of voluntary excitement rather than tedious obligation. I have been rewarded tenfold.

It’s nearly the end of term now. I don’t have to throw nearly as much energy into building a community which is clearly now self sustaining. When I launch Discord now, I read the beauty of students sharing their passion for the subject I teach. I watch them linking videos they have found about the topic for one another to review, I see them helping each other as they work on assignments, I delight in their thoughtful, well-considered responses. They post at hours I’d be sleeping, or before they go to work, or while they’re out walking and have their phones handy. The key features have been convenience, utility, and community. Discord simply was a capable, organic platform to facilitate this level of engagement, and it was one the students took to with excitement and enthusiasm.

And now, every morning when I wake up, I no longer ‘watch the war.’ Every morning these students upstage everything I thought I knew as I see greater engagement than I’d even get in a seminar room at this stage in a term. I am awed, and I am humbled to see the passion among these learners, and to be a part of the community we share.

3 Open Source Tools to Help You Create

Over the summer the goal of our work was to help people scale up quickly and get ready to deliver the good stuff online in time for September. Now that we’re confidently knee-deep into autumn, and you’ve got the basics down pat, you might be considering taking it to the next level.

Below we’ve listed just a few open source media tools that can help you create, edit, and refine your learning materials. Depending on your technological proficiency these programs might look a bit daunting, but everyone starts somewhere. The more you play around and experiment the better you’ll get. And we’re here to help and encourage your experiments!

OBS Studio

Open Broadcaster Software gives you the ability to record or stream video all on your own. If you’ve seen some of the crazy things people can do while streaming on YouTube or Twitch, you get the idea of just how far you can take things. And OBS is a tool that many of them use to make it happen. With OBS, you’ll have the power to fine tune your video production (the layout of visual elements, organizing different audio inputs). OBS is a great tool to play around with if you’re looking to move beyond simple virtual backgrounds, or for anyone looking to add more visual flair to their videos. Here’s a guide to get you started.

Batman dropping in on a makeshift green screen created in OBS

GIMP

GIMP stands for GNU Image Manipulation Program, a free and open source Photoshop alternative that has been in the works for decades. GIMP is packed full of features and tools that will allow you to create, edit, and save images in a variety of formats. While the interface might seem excessive, GIMP is an excellent choice when MS Paint or Preview won’t cut it—without the price tag that comes with a tool like Photoshop.

Toggling layer visibility in GIMP

Audacity

Yet another open source tool that has stood the test of time, Audacity is a program that will let you record and edit digital audio. You’ll be able to visually observe your waveforms, snip and paste selected segments, and export your edited audio. Audacity is for people looking to record podcasts, or work with their audio independently of other media.

Cutting and pasting audio in Audacity
Cutting and pasting recorded audio in Audacity

It takes some time to master these open source tools, so don’t expect overnight edu-stardom (maybe give it a week or two), but as you learn the ins and outs and develop material, you’ll likely see how they can help you to refine and create even better stuff for your students.

Remember that as a student or faculty member you’ll have access to Trent’s Virtual Computing Commons, which will allow you to remotely operate a school desktop environment with access to a variety of specialized software.

Want to learn more? Shoot us an email at online[at]trentu.ca!

image source: “Open is Never Having to Say You Are Sorry” flickr photo by cogdogblog https://flickr.com/photos/cogdog/26865079377 shared into the public domain using (CC0)

css.php